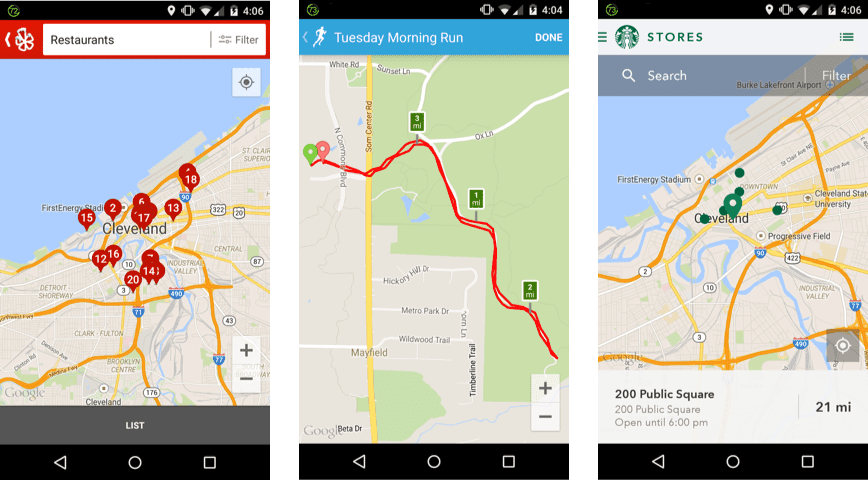
Knowing a user’s location in an Android app can be extremely useful. Users take their devices everywhere and are constantly using them on the go, and as developers we can capitalize on that by providing a more contextual experience based on their current location.
Accessing the current location of an Android device is easier than ever, but it can still be a little tricky, especially for the first time. What follows is a guide on the very basics of retrieving a user’s current location and displaying it with a marker on a map. The project files for this project are available on GitHub, but follow along and in a few minutes we’ll build a super simple location finder!
This is a somewhat complex topic in Android, but these step-by-step guidelines should explain everything you need. If you would like to learn more about the fundamentals of Android programming that lead up to this, please check out my Android Development Trackon Treehouse.
Location and Google Play Services
Android has two basic ways to determine a user’s location. The first is to use the built-in location APIs that have been available since Android was first introduced. These still work, but not as well as the newer location APIs bundled as part of the beast known as Google Play Services:
The Google Location Services API, part of Google Play Services, provides a more powerful, high-level framework that automates tasks such as location provider choice and power management. Location Services also provides new features such as activity detection that aren’t available in the framework API. Developers who are using the framework API, as well as developers who are just now adding location-awareness to their apps, should strongly consider using the Location Services API. – link
Google Play Services is a bundle of services and APIs from Google that we can use for lots of features in Android apps. They are installed on a majority of devices and run on Android 2.3 and up. There are a lot of different parts of Google Play Services, but we will see how to include them in a project and use them for detecting location in a quick and effective way.
We need to download the Google Play Services SDK using the SDK Manager. It’s a separate download just like a new version of the Android SDK. If you don’t have it already, check out the Setting Up Google Play Services page on the Android developer site for details on how to download it. You may also want to download an emulator (AVD) image that uses the Google APIs, but more on that below.
Creating the Project
*If you are having trouble with creating the project or any of the code, download my completed project from GitHub.
We are going to work with a project template available in Android Studio. The “Google Maps Activity” template generates some boilerplate code for location that will make this very easy for us.
- Create new project (I named mine “I Am Here”).
- Select “Phone & Tablet” as the form factor. We aren’t going to work with anything else for this project, though it will be fairly straightforward to extend it.
- Select the “Google Maps Activity” as the template for the Activity and then finish creating the project:

The Google Maps Activity template makes a few things quite a bit easier
Configuring Google Play Services
Your new project should start with google_maps_api.xml open, but if not, you can find it in res/values. This file contains helpful comments about what you need to get started. It even has a URL! Basically all you need to do is visit this personalized link and sign up for a Google Maps API Key. It’s free to sign up if you don’t already have an account, and when you get a key from that site you come back to this file and replace YOUR_KEY_HERE with your new key. The screenshots below walk through this process if you need a reference.
Select “Create a new project” and click Continue: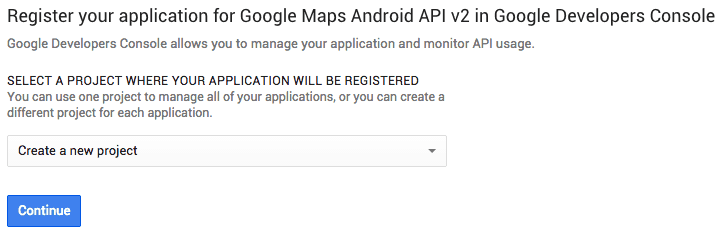
Creating the new project takes a few seconds: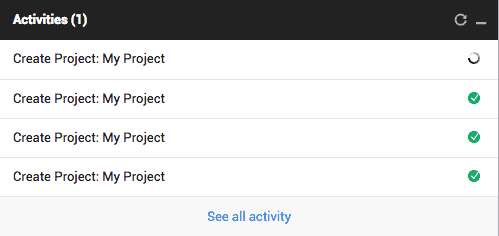
Click Create to finally create your API key: 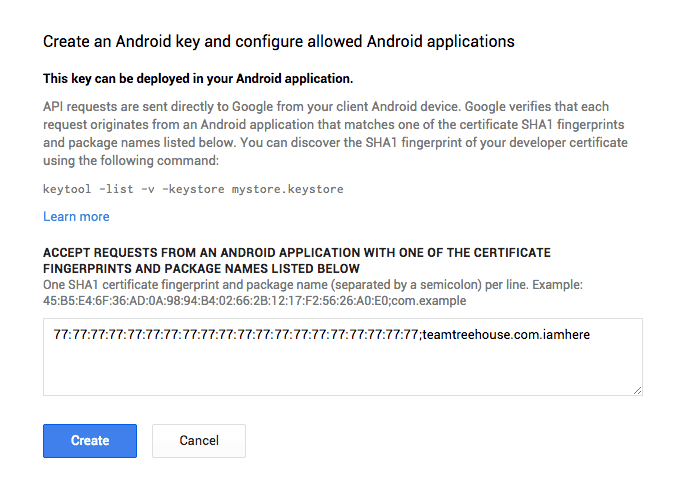
Finally, copy and paste your API KEY into your app!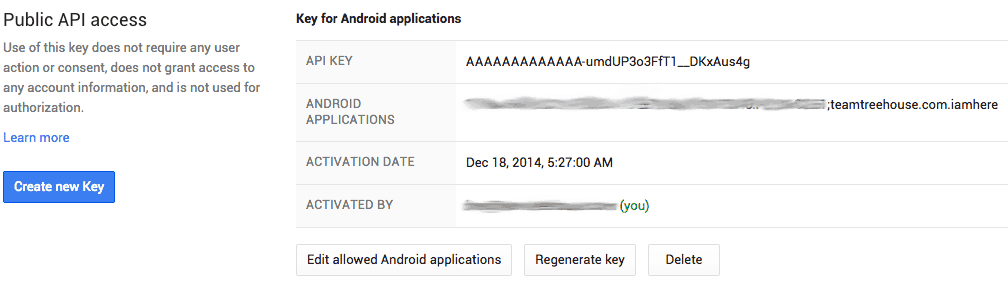
google_maps_api.xml
<resources>
  <string name="google_maps_key_instructions" templateMergeStrategy="replace"><!--

  TODO: Before you run your application, you need a Google Maps API key.

  To get one, follow this link, follow the directions and press "Create" at the end:

https://console.developers.google.com/flows/enableapi?apiid=maps_android_backend&keyType=CLIENT_SIDE_ANDROID&r=XX:XX:XX:XX:XX:XX:XX:XX:XX:XX:XX:XX:XX:XX:XX:XX:XX:XX:XX:XX%3Bteamtreehouse.com.iamhere

  You can also add your credentials to an existing key, using this line:
  XX:XX:XX:XX:XX:XX:XX:XX:XX:XX:XX:XX:XX:XX:XX:XX:XX:XX:XX:XX;teamtreehouse.com.iamhere

  Once you have your key (it starts with "AIza"), replace the "google_maps_key"
  string in this file.
  --></string>

  <string name="google_maps_key" templateMergeStrategy="preserve">YOUR_KEY_HERE</string>
</resources>
Note this is really just a simple string resource. If you want to organize strings differently, feel free to move the
google_maps_key string into strings.xml.
We’re ready to run the app for the first time at this point, but before we do, let’s take a look at what is included in our
build.gradle file. Open the build.gradle file for the app module (not the whole Project), and we find this in the dependencies section at the bottom:dependencies {
compile fileTree(dir: 'libs', include: ['*.jar'])
compile 'com.android.support:appcompat-v7:21.0.3'
compile 'com.google.android.gms:play-services:6.5.87'
}
The last line here is the important one to pull in Google Play Services. Gradle’s dependency management system will get the appropriate files we need so we can use them in our app. This used to be a lot harder, so thank you, Gradle! Don’t worry if your version numbers are different. These change constantly as new releases of the libraries are published, so you will likely be using a newer version than this if your tools are up-to-date.
Running for the First Time
I mentioned earlier that we need a device or emulator that has Google Play Services installed. Most devices do have this installed by default, but the Android emulators that run just the Android APIs do not. If we try running this app with one of those emulators, we will see an error message like the screenshot below.
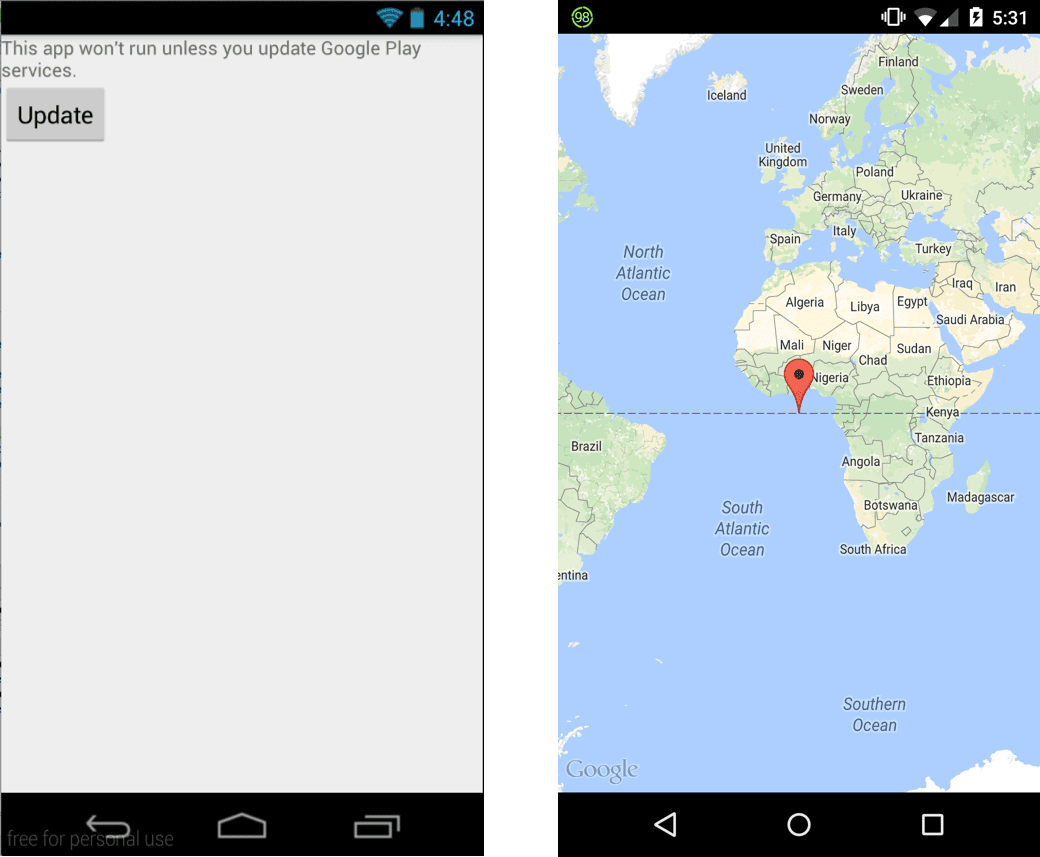
Start the SDK Manager again and select one of the emulator (AVD) images that uses the Google APIs. Once you have an appropriate device or emulator to test on, run the app and verify that the map loads. If so, then your new API key is valid and your project is ready to extend!
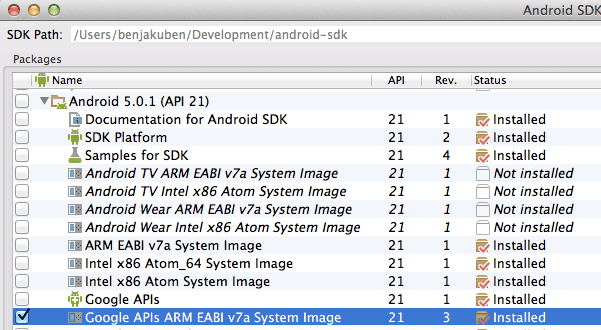
Make sure you have a device or emulator that runs the Google APIs!
Getting the Current Location
Using maps in an app no longer require extra permissions, but accessing the location of the device still does. The required permissions should already be in your AndroidManifest.xml file from the template, but check to make sure these two are there:
<!--
The ACCESS_COARSE/FINE_LOCATION permissions are not required to use
Google Maps Android API v2, but are recommended.
-->
<uses-permission android:name="android.permission.ACCESS_COARSE_LOCATION" />
<uses-permission android:name="android.permission.ACCESS_FINE_LOCATION" />
CHECKING FOR GOOGLE PLAY SERVICES
The first thing we need to do is check to make sure that Google Play Services are even available. Like I said, it is installed by default on most devices, but if it isn’t we should prompt the user to install it before using our app. Fortunately this part is taken care of automatically for us by the generated code in our project. There are comments about this in MapsActivity.java.
CREATING A GOOGLE API CLIENT
Let’s finally add some code! We’ll start by adding a new member variable in MapsActivity.java. We are going to use the GoogleApiClient, which is the latest client in Google Play Services that was designed to make this and other functions from Google Play Services easier to setup and use.
private GoogleApiClient mGoogleApiClient;
We’ll need a TAG variable in a little bit, so let’s add that while we’re here:
public static final String TAG = MapsActivity.class.getSimpleName();
And now we can initialize our client it at the bottom of MapActivity’s
onCreate() method.mGoogleApiClient = new GoogleApiClient.Builder(this)
.addConnectionCallbacks(this)
.addOnConnectionFailedListener(this)
.addApi(LocationServices.API)
.build();
Don’t worry that there is an error about this: we’ll fix it in a moment!
So what exactly are these lines doing for us? The first is to create a new GoogleApiClient object using the Builder pattern that you may have seen in Android with things like AlertDialogs. The methods are chained together to make the code easier to understand. The next two lines tell the new client that “this” current class (MapsActivity) will handle connection stuff. We’ll add that next.
The fourth line adds the LocationServices API endpoint from GooglePlayServices, and then finally the client is built for us. It’s almost ready to connect!
IMPLEMENTING LOCATION CALLBACKS
But first we need to implement some methods for those interfaces related to those two lines about callbacks and a listener. Getting a user’s location is an asynchronous process because it might take a little time to get the location data. We don’t want the app to be unresponsive while it’s waiting, so we do that work in the background. When that work is done in the background, it needs to get back to this main thread somehow. That’s where callbacks come in. The code we write in a callback method gets executed when that background work “calls back” with some sort of result.
Anyhow, up in the line where we declare our class, add
implements and these interfaces:public class MapsActivity extends FragmentActivity implements
GoogleApiClient.ConnectionCallbacks,
GoogleApiClient.OnConnectionFailedListener {
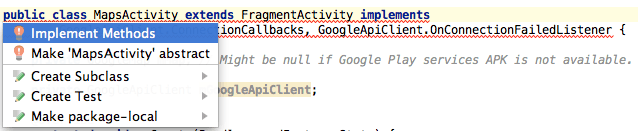
The error for “this” in our GoogleApiClient lines is now gone because “this” class is now implementing the appropriate interfaces. But new errors are showing because we need to add the required methods. Click somewhere on the line we just added, and then hit ALT+ENTER to bring up Android Studio’s Quick Fix menu. Select “Implement Methods” and then click “OK” to choose the three selected methods (see screenshots below).
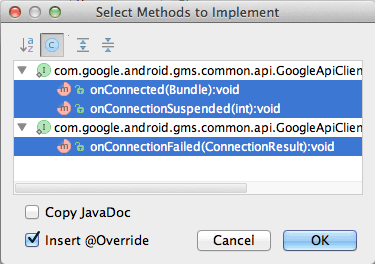
Very nice! For now, let’s just log the fact that we are connecting and disconnecting in each method:
@Override
public void onConnected(Bundle bundle) {
    Log.i(TAG, "Location services connected.");
}

@Override
public void onConnectionSuspended(int i) {
    Log.i(TAG, "Location services suspended. Please reconnect.");
}
CONNECTING AND DISCONNECTING
Alright, our client is built and ready to start work. We need to connect it before we can use it, so let’s add a call to connect the client in our Activity’s
onResume() method. Why onResume()and not onStart()? Remember the Activity’s lifecycle. Our Activity may be paused at any time, like when a call or text message comes in, for example. So we want to pause and then resume any activity, such as network connections or location updates like this. onResume() is called right after onCreate(), so if we connect there then we will always be able to access location when our Activity is visible.
Add the line
mGoogleApiClient.connect() to the onResume() method that should already be in MapsActivity.java:@Override
protected void onResume() {
super.onResume();
setUpMapIfNeeded();
mGoogleApiClient.connect();
}
Whenever we add code in
onResume() we want to think about adding corresponding code inonPause(). We don’t always need something, but in this case we want to disconnect from location services when our Activity is paused. Then we will be reconnected if the Activity is resumed again. Add this whole method below onResume(). Notice that we are verifying that the client is connected before calling disconnect(). This isn’t super important now but it will be necessary later.@Override
protected void onPause() {
super.onPause();
if (mGoogleApiClient.isConnected()) {
mGoogleApiClient.disconnect();
}
}
LOGGING THE CURRENT LOCATION
When our client finally connects to the location services, the
onConnected() method will be called. We just added an empty shell for that method using the Quick Fix, but now we can get the last known location and log it.Using the Google Play services location APIs, your app can request the last known location of the user’s device. In most cases, you are interested in the user’s current location, which is usually equivalent to the last known location of the device. – link
Add the following line in the
onConnected() method:Location location = LocationServices.FusedLocationApi.getLastLocation(mGoogleApiClient);
Great! This seems like enough…but the last location might be null if this is the first time Google Play Services is checking location, or perhaps for other reasons. So let’s start by adding a null check and only handling this new location if it is NOT null. We’ll handle the new location in a new method, so add this code and then we’ll add the method:
if (location == null) {
    // Blank for a moment...
}
else {
    handleNewLocation(location);
};
Now add this new method to the MapsActivity class:
private void handleNewLocation(Location location) {
    Log.d(TAG, location.toString());
}
Now if we run this and check the log we will see either a successful location printed or nothing at all. It totally depends if the emulator or device we are testing on has a location stored in the last known location from Google Play Services. Don’t worry if yours doesn’t show anything yet because we will handle that scenario in a moment. But if there is a location to retrieve it looks like this:
HANDLING ERRORS
We won’t do anything special about the error cases, but it’s important to know that Google Play Services includes some built-in mechanisms for handling certain errors. The first thing we need is a constant static member variable at the top of our MapsActivity class. This defines a request code to send to Google Play services, which is returned in
Activity.onActivityResult():private final static int CONNECTION_FAILURE_RESOLUTION_REQUEST = 9000;
Then paste the code below into the
onConnectionFailed() method. There are more detailed comments in the source on GitHub, and check the documentation for a little more information.@Override
public void onConnectionFailed(ConnectionResult connectionResult) {
if (connectionResult.hasResolution()) {
try {
// Start an Activity that tries to resolve the error
connectionResult.startResolutionForResult(this, CONNECTION_FAILURE_RESOLUTION_REQUEST);
} catch (IntentSender.SendIntentException e) {
e.printStackTrace();
}
} else {
Log.i(TAG, "Location services connection failed with code " + connectionResult.getErrorCode());
}
}
Requesting Location Updates
Now that we’ve done the bare minimum about getting a location, let’s go one step further and learn how to request location updates. This is especially important when, as mentioned earlier, the last known location is not available from the fused location provider we are using. It also becomes particularly important in an app that tracks the user’s location, like a run-tracking or navigation app.
We need to implement one more interface: LocationListener. Add this to the list of interfaces implemented in the class declaration, but when you do, make sure you import the Google Play Services version of LocationListener, not the regular Android version! Check this screenshot to see the difference based on the different packages:
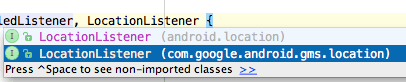
Make sure you get the Google Play Services one!
This is what our class declaration should now look like:
public class MapsActivity extends FragmentActivity implements
        GoogleApiClient.ConnectionCallbacks,
        GoogleApiClient.OnConnectionFailedListener,
        LocationListener {
Once again we will have an error about unimplemented methods, and once again we can use the Android Studio Quick Fix to add what we need. Click anywhere on this line and hit ALT + ENTER. Select “Implement Methods” and click OK to implement
onLocationChanged().
This new method gets called every time a new location is detected by Google Play Services. So as the user is moving around with their phone or tablet, the location APIs are updating the location silently in the background. When the current location is updated, this method is called, and we can now handle it in our Activity. We happen to have a method already that is perfect for this:
handleNewLocation()!@Override
public void onLocationChanged(Location location) {
handleNewLocation(location);
}
CREATING AND STARTING THE REQUEST
We have the
onLocationChanged() callback prepared, but we don’t have anything set up yet to actually call it. We need to create and configure a special LocationRequest object. We will use it in a few places, so let’s add a new member variable:private LocationRequest mLocationRequest;
Now we can initialize this variable in
onCreate(). Copy and paste these lines and then read on for an explanation.// Create the LocationRequest object
mLocationRequest = LocationRequest.create()
.setPriority(LocationRequest.PRIORITY_HIGH_ACCURACY)
.setInterval(10 * 1000) // 10 seconds, in milliseconds
.setFastestInterval(1 * 1000); // 1 second, in milliseconds
This creation method once again chains method to create and configure the location request in an organized way. The first thing we do is set the priority to high accuracy. This means that we are requesting as accurate a location as possible. This kind of request requires more power and time, but for lots of apps we want to know the user’s location with high accuracy. If we don’t need such an accurate location we can use one of the lower priorities instead.
The next line sets the interval between active location updates. In a navigation app, for example, we probably want a low interval. But a lower interval (more frequent requests) has a “direct influence on the amount of power used by your application”, so we must choose wisely.
Finally, the last line sets the fastest interval at which our app will receive updates. This can be lower than the interval we set ourselves in case other apps are requesting location updates from Google Play Services. When that happens, our app can passively listen to any location updates, which doesn’t cost any extra power.
Now we just need to use this request. We use it with our GoogleApiClient using a special method from the fused location provider. Let’s add this line in our
onConnected() method where we check to see if the last location is null:@Override
public void onConnected(Bundle bundle) {
Location location = LocationServices.FusedLocationApi.getLastLocation(mGoogleApiClient);
if (location == null) {
LocationServices.FusedLocationApi.requestLocationUpdates(mGoogleApiClient, mLocationRequest, this);
}
else {
handleNewLocation(location);
}
}
For this example we are only going to request location updates when the last location is not known. If we needed to, though, we could rewrite this code to ignore the last location and always request new updates.
REMOVING UPDATES WHEN FINISHED
Just like we have to disconnect our client, we also need to explicitly remove location updates after requesting them. We do this with the opposite method, which we can call in
onPause()when we disconnect our Google API client:@Override
protected void onPause() {
super.onPause();
if (mGoogleApiClient.isConnected()) {
LocationServices.FusedLocationApi.removeLocationUpdates(mGoogleApiClient, this);
mGoogleApiClient.disconnect();
}
}
Showing a Location on a Map
Let’s finish this simple app with a quick lesson on how to add a marker on a map for a given location. We will show the user’s current location and then center the map on it. The generated code from this project template makes this very easy to do!
Take a look at the
setUpMap() method that is already in our class. When running this app we have already seen how a default map marker is added at latitude/longitude of 0, 0. This is the line of code that adds that marker:private void setUpMap() {
mMap.addMarker(new MarkerOptions().position(new LatLng(0, 0)).title("Marker"));
}
All we need to do is write this same line with the new latitude and longitude values available in our Location variable. (Feel free to remove or comment this line out if you only want one marker on your map, though you can add as many markers as you want.)
The following lines of code will be added in our
handleNewLocation() helper method. First, we can get the latitude and longitude coordinates of the location using these two methods from the Location class:double currentLatitude = location.getLatitude(); double currentLongitude = location.getLongitude();
For convenience, let’s use these coordinates to create a new LatLng variable:
LatLng latLng = new LatLng(currentLatitude, currentLongitude);
We could copy and paste the line to add a marker from
setUpMap(), but let’s build a new one to see how it works. The first thing we need to do is define the options about the new marker using the class MarkerOptions. In this example we will set its position and the title that will appear when it is tapped on:MarkerOptions options = new MarkerOptions()
.position(latLng)
.title("I am here!");
We then add a marker to the map using these options with this line:
mMap.addMarker(options);
And just one more line of code! It’s a big map, and we may need to adjust the view to center on this new location. We do that by moving the “camera” that is viewing the map:
mMap.moveCamera(CameraUpdateFactory.newLatLng(latLng));
Our final
handleNewLocation() method now looks like this:private void handleNewLocation(Location location) {
Log.d(TAG, location.toString());
double currentLatitude = location.getLatitude();
double currentLongitude = location.getLongitude();
LatLng latLng = new LatLng(currentLatitude, currentLongitude);
MarkerOptions options = new MarkerOptions()
    .position(latLng)
    .title("I am here!");
mMap.addMarker(options);
mMap.moveCamera(CameraUpdateFactory.newLatLng(latLng));
}
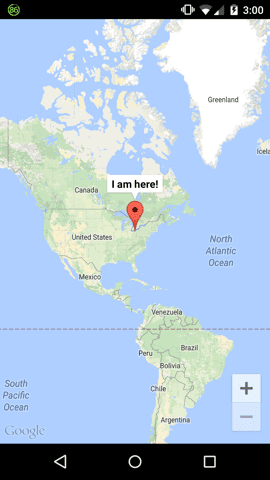
And if we run the app to verify, we will see a new marker that lets us know exactly where we are, in case we didn’t know that already. 
To Infinity…and Beyond!
That may seem like a lot of work to get a user’s location, but if you successfully completed it, you now have a working model to use whenever you need to access location in the future. Congratulations!
Personally, I don’t like having my Activities implement so many interfaces. I generally try to abstract such things into separate objects. I’ve done that with this project and made it available as a separate GitHub repo if you want to check it out. It does the same exact thing as what we have just covered but with a slightly different organization. This alternate solution is easy to plug and play into existing activities, so please feel free to use and improve it!
The training module about location from Google Play Services can be a little tricky to navigate, but it is a great reference if you get stuck. Definitely check it out if you need to do more in your app than the basics covered here. Also stay tuned for a future Treehouse coursethat will cover these steps and more!


