No descarga el megadownloader alguien sabe donde descargar el 1.8?
miércoles, 14 de junio de 2017
miércoles, 22 de febrero de 2017
Error occurred during initialization of VM Could not reserve enough space for 2097152KB
Como solucionar el error
Error occurred during initialization of VM
Error occurred during initialization of VM
Could not reserve enough space for 2097152KB object heap
Java HotSpot(TM) Client VM warning: ignoring option MaxPermSize=256m; support was removed in 8.0
Edita el archivo Spoon.bat y en lña linea:
if "%PENTAHO_DI_JAVA_OPTIONS%"=="" set PENTAHO_DI_JAVA_OPTIONS="-Xms1024m" "-Xmx2048m" "-XX:MaxPermSize=256m"
Cambiar el 2048 a 1024
quedando asi:
if "%PENTAHO_DI_JAVA_OPTIONS%"=="" set PENTAHO_DI_JAVA_OPTIONS="-Xms1024m" "-Xmx1024m" "-XX:MaxPermSize=256m"
Listo
jueves, 20 de octubre de 2016
Apache Tomcat que es y para que sirve
Apache Tomcat
Que es?
Tomcat es un contenedor de servlets/jsp. Es decir, es un módulo para ejecutar servlets y/o páginas JSP en tus aplicaciones Web.Para que sirve
Java: Primera aplicación web con Eclipse
Varias personas que están empezando en la
programación y desean usar Eclipse como IDE se preguntan como hacer su primera
aplicación web, como configurar el tomcat y como configurar el JDK / JRE. Para
resolver aquellas interrogante, les dejo este pequeño manual.
1. Al iniciar el Eclipse verán una ventana similar a esta.

2. Para realizar una aplicación en Java ya sea web o escritorio se deberá configurar el JRE. Para esto ingresamos a la opción de menú Window - Preferences

3. Se mostrará una ventana con todas las configuraciones del Eclipse. Elegimos Java - Installed JREs y se mostrarán los JRE configurados hasta ese momento. Tener en cuenta que se pueden configurar diferentes versiones según el los desarrollos que se hagan.

4. En la imagen vemos configurado el jre6, entonces agregaremos el jre5. Para esto elegimos el botón Add y escogemos la ruta de instalación de dicho jre. Regularmente en ambientes Windows la ruta de instalación es:
C:\Archivos de programa\Java


5. Al seleccionar la carpeta del JRE se cargarán las librerías del sistema. Y listo, ya está configurado el JRE

6. Ahora procedemos a configurar el Tomcat que será de contenedor de aplicaciones para nuestra primera aplicación web. Para esto ingresamos a las configuraciones del Eclipse como se hizo en el paso 3, y elegimos la opción Server - Runtime Environments.
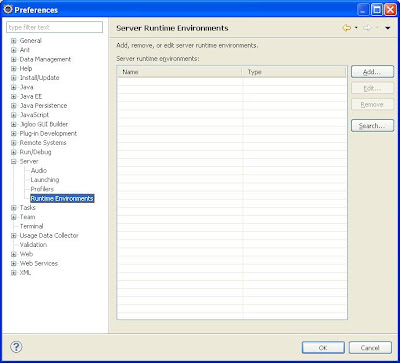
7. Escogemos el botón Add, luego elegimos Apache Tomcat 5.5 (podría se cualquier versión que tengan a la mano), escogemos el botón Siguiente e indicamos la carpeta de instalación de nuestro Tomcat.

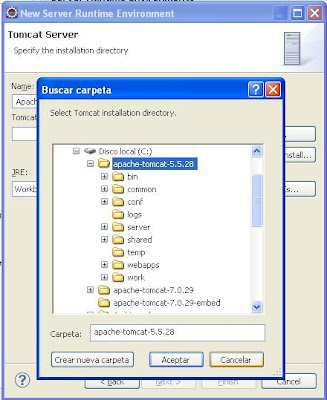
8. Elegimos el JRE con el que trabajará el Tomcat que estamos configurando y elegimos el botón Finish

9. Ya configurado el JRE y el Tomcat, entonces nos toca crear nuestra primera aplicación web. Sobre el explorador de proyectos damos click derecho y elegimos New - Project - Web - Dynamic Web Project y elegimos el botón Next.

10. Ingresamos el nombre del proyecto iadFirstWebApp, elegimos Tomcat 5.5 como Target Runtime y elegimos el botón Finish.

11. En este punto, el explorador de proyectos tiene la siguiente estructura.


14. Ahora solo queda ejecutar el proyecto, para esto en el explorador de proyectos elegimos iadFirstWebApp le damos click derecho y elegimos Run As - Run on Server

1. Al iniciar el Eclipse verán una ventana similar a esta.

2. Para realizar una aplicación en Java ya sea web o escritorio se deberá configurar el JRE. Para esto ingresamos a la opción de menú Window - Preferences

3. Se mostrará una ventana con todas las configuraciones del Eclipse. Elegimos Java - Installed JREs y se mostrarán los JRE configurados hasta ese momento. Tener en cuenta que se pueden configurar diferentes versiones según el los desarrollos que se hagan.

4. En la imagen vemos configurado el jre6, entonces agregaremos el jre5. Para esto elegimos el botón Add y escogemos la ruta de instalación de dicho jre. Regularmente en ambientes Windows la ruta de instalación es:
C:\Archivos de programa\Java


5. Al seleccionar la carpeta del JRE se cargarán las librerías del sistema. Y listo, ya está configurado el JRE

6. Ahora procedemos a configurar el Tomcat que será de contenedor de aplicaciones para nuestra primera aplicación web. Para esto ingresamos a las configuraciones del Eclipse como se hizo en el paso 3, y elegimos la opción Server - Runtime Environments.

7. Escogemos el botón Add, luego elegimos Apache Tomcat 5.5 (podría se cualquier versión que tengan a la mano), escogemos el botón Siguiente e indicamos la carpeta de instalación de nuestro Tomcat.


8. Elegimos el JRE con el que trabajará el Tomcat que estamos configurando y elegimos el botón Finish

9. Ya configurado el JRE y el Tomcat, entonces nos toca crear nuestra primera aplicación web. Sobre el explorador de proyectos damos click derecho y elegimos New - Project - Web - Dynamic Web Project y elegimos el botón Next.

10. Ingresamos el nombre del proyecto iadFirstWebApp, elegimos Tomcat 5.5 como Target Runtime y elegimos el botón Finish.

11. En este punto, el explorador de proyectos tiene la siguiente estructura.

12. Para que la
aplicación web al ejecutarse pueda mostrar una página web de inicio, deberá
crearse el archivo index.jsp (puede tener otro nombre, según lo que se indique
en el archivo web.xml). Para crear este archivo, elegimos la carpeta WebContent,
le damos click derecho seleccionamos New - JSP File.
Ingresamos el nombre
del archivo index.jsp

13. Se cargará el
contenido del archivo index.jsp, podemos editarlo si deseamos. Aquí les dejo una
pequeña modificación.
<%@ page language="java" contentType="text/html; charset=ISO-8859-1"
    pageEncoding="ISO-8859-1"%>
14. Ahora solo queda ejecutar el proyecto, para esto en el explorador de proyectos elegimos iadFirstWebApp le damos click derecho y elegimos Run As - Run on Server

viernes, 23 de septiembre de 2016
Modificar un excel o habrir un excel en java
1. Instalacion
Download the Java Excel library from the webpage http://jexcelapi.sourceforge.net/
To use this library in your Java program add the lib jxl.jar to your classpath in your project. See Changing classpath in Eclipse.
2. Crear una hoja en excel
Create a new Java project called de.vogella.java.excel. Create the de.vogella.java.excel.writer package and the following class.

package writer;
import java.io.File;
import java.io.IOException;
import java.util.Locale;
import jxl.CellView;
import jxl.Workbook;
import jxl.WorkbookSettings;
import jxl.format.UnderlineStyle;
import jxl.write.Formula;
import jxl.write.Label;
import jxl.write.Number;
import jxl.write.WritableCellFormat;
import jxl.write.WritableFont;
import jxl.write.WritableSheet;
import jxl.write.WritableWorkbook;
import jxl.write.WriteException;
import jxl.write.biff.RowsExceededException;
public class WriteExcel {
private WritableCellFormat timesBoldUnderline;
private WritableCellFormat times;
private String inputFile;
public void setOutputFile(String inputFile) {
this.inputFile = inputFile;
}
public void write() throws IOException, WriteException {
File file = new File(inputFile);
WorkbookSettings wbSettings = new WorkbookSettings();
wbSettings.setLocale(new Locale("en", "EN"));
WritableWorkbook workbook = Workbook.createWorkbook(file, wbSettings);
workbook.createSheet("Report", 0);
WritableSheet excelSheet = workbook.getSheet(0);
createLabel(excelSheet);
createContent(excelSheet);
workbook.write();
workbook.close();
}
private void createLabel(WritableSheet sheet)
throws WriteException {
// Lets create a times font
WritableFont times10pt = new WritableFont(WritableFont.TIMES, 10);
// Define the cell format
times = new WritableCellFormat(times10pt);
// Lets automatically wrap the cells
times.setWrap(true);
// create create a bold font with unterlines
WritableFont times10ptBoldUnderline = new WritableFont(WritableFont.TIMES, 10, WritableFont.BOLD, false,
UnderlineStyle.SINGLE);
timesBoldUnderline = new WritableCellFormat(times10ptBoldUnderline);
// Lets automatically wrap the cells
timesBoldUnderline.setWrap(true);
CellView cv = new CellView();
cv.setFormat(times);
cv.setFormat(timesBoldUnderline);
cv.setAutosize(true);
// Write a few headers
addCaption(sheet, 0, 0, "Header 1");
addCaption(sheet, 1, 0, "This is another header");
}
private void createContent(WritableSheet sheet) throws WriteException,
RowsExceededException {
// Write a few number
for (int i = 1; i < 10; i++) {
// First column
addNumber(sheet, 0, i, i + 10);
// Second column
addNumber(sheet, 1, i, i * i);
}
// Lets calculate the sum of it
StringBuffer buf = new StringBuffer();
buf.append("SUM(A2:A10)");
Formula f = new Formula(0, 10, buf.toString());
sheet.addCell(f);
buf = new StringBuffer();
buf.append("SUM(B2:B10)");
f = new Formula(1, 10, buf.toString());
sheet.addCell(f);
// now a bit of text
for (int i = 12; i < 20; i++) {
// First column
addLabel(sheet, 0, i, "Boring text " + i);
// Second column
addLabel(sheet, 1, i, "Another text");
}
}
private void addCaption(WritableSheet sheet, int column, int row, String s)
throws RowsExceededException, WriteException {
Label label;
label = new Label(column, row, s, timesBoldUnderline);
sheet.addCell(label);
}
private void addNumber(WritableSheet sheet, int column, int row,
Integer integer) throws WriteException, RowsExceededException {
Number number;
number = new Number(column, row, integer, times);
sheet.addCell(number);
}
private void addLabel(WritableSheet sheet, int column, int row, String s)
throws WriteException, RowsExceededException {
Label label;
label = new Label(column, row, s, times);
sheet.addCell(label);
}
public static void main(String[] args) throws WriteException, IOException {
WriteExcel test = new WriteExcel();
test.setOutputFile("c:/temp/lars.xls");
test.write();
System.out
.println("Please check the result file under c:/temp/lars.xls ");
}
}
I assume that the code is pretty much self-explaining. I tried to add lots of comments to make it easier to understand.For more complex examples have a look at the excellent documentation of the Java Excel API which is also part of the distribution.
3. Read an existing Excel Spreadsheet
Reuse the project "de.vogella.java.excel". Create a package "de.vogella.java.excelreader" and the following class "ReadExcel".
package reader;
import java.io.File;
import java.io.IOException;
import jxl.Cell;
import jxl.CellType;
import jxl.Sheet;
import jxl.Workbook;
import jxl.read.biff.BiffException;
public class ReadExcel {
private String inputFile;
public void setInputFile(String inputFile) {
this.inputFile = inputFile;
}
public void read() throws IOException {
File inputWorkbook = new File(inputFile);
Workbook w;
try {
w = Workbook.getWorkbook(inputWorkbook);
// Get the first sheet
Sheet sheet = w.getSheet(0);
// Loop over first 10 column and lines
for (int j = 0; j < sheet.getColumns(); j++) {
for (int i = 0; i < sheet.getRows(); i++) {
Cell cell = sheet.getCell(j, i);
CellType type = cell.getType();
if (type == CellType.LABEL) {
System.out.println("I got a label "
+ cell.getContents());
}
if (type == CellType.NUMBER) {
System.out.println("I got a number "
+ cell.getContents());
}
}
}
} catch (BiffException e) {
e.printStackTrace();
}
}
public static void main(String[] args) throws IOException {
ReadExcel test = new ReadExcel();
test.setInputFile("c:/temp/lars.xls");
test.read();
}
}
Create an excel spreadsheet and save it somewhere, e.g. "c:/temp/lars.xls".
Suscribirse a:
Entradas (Atom)